Program - Preset types & properties
The Program window is where you put your presentation together by dragging and dropping the built-in effects and your Mover, Media and Custom Presets onto your fixtures, groups and Pixel Matrices:
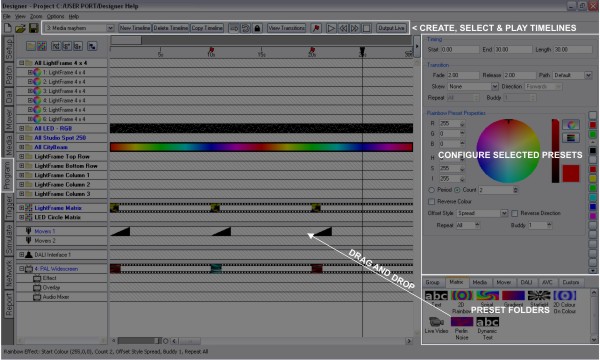
The window comprises 4 sections:
On the left is the Browser, in the middle the Timeline editing area with its associated toolbar across the top. Bottom right are the folders of Group, Matrix, Media, Mover, DALI, AVC and Custom Presets (although not all folders may be displayed). Above this is the Preset Properties pane which is divided into Timing, Transition and Properties all of which you use to manipulate how a preset placed on a timeline is rendered.
It is useful simultaneously to view the output of a timeline to check your programming thus the Simulate window can be opened at the same time as the Program window by selecting View > Tear off simulate or by holding Ctrl (Apple) and pressing F8, see Simulate for details.
Before creating a timeline it is worth covering the seven preset types:
Group Presets
A range of presets from simple colour fills to rainbow, sparkle and chase effects. These presets have no spatial awareness and are applied to fixtures and groups using the fixture ordering (as set in the Browser) to determine how they are rendered and in what order the fixtures will transition. They are akin to the sort of programming, effects and cue timing that is available on moving light consoles:
 Fixed colour
The most basic preset, renders a static colour fill. Use the colour picker, user palette or text entry fields (RGB or HSI) to select the colour.
 Colour fan
Renders a static multi-colour gradient over a group of fixtures:
- To change a colour, press on the coloured button, select a colour and press Ok
- To move a colour, click and drag the coloured button
- To add a new colour, click anywhere on the slider where there is no button
- To remove a colour, right-click on the coloured button
- Repeat - the number of elements between the start and end of the fan
- Buddy - the number of elements that will be set to the same colour in the fan (if Buddy is greater than 1, the number of elements that are repeated over is Repeat multiplied by Buddy)
 Random colour
Renders a dynamic chase through a random sequence of colours:
- Colour - specifies the first colour of the sequence, all subsequent colours are relative to the start colour in a pseudo-random way (saturation and intensity levels are maintained)
- Period - the number of seconds that the sequence takes to complete
- Count - the number of times that the sequence should complete over the length of the preset
- Offset Style - choose None (all elements are the same colour) or Spread (the sequence is spread over space as well as time)
- Fade - the fade time in seconds between each colour in the sequence
- Hold - the time that each colour in the sequence is not fading
- Steps - the number of steps in the sequence
- Seed - the seed of the pseudo-random sequence (copying this value to another preset will create the same random sequence)
- Randomise - picks a new seed
 Rainbow effect
Renders a dynamic rainbow effect cycling through hue:
- Colour - specifies the start colour of the rainbow (the saturation and intensity are maintained throughout the cycle)
- Period - the number of seconds that the rainbow takes to complete one cycle
- Count - the number of times that the rainbow should cycle over the length of the preset
- Reverse Colour - reverses the direction around the hue circle (default (unchecked) is clockwise)
- Offset Style - Choose None (all elements are the same colour), Spread (the rainbow is spread over space as well as time) or One Shot (as None, but will stop after one cycle of the hue circle)
- Reverse Direction - if Offset Style is Spread, reverse the direction of the spread in space
- Repeat - the number of elements between the start and end of the hue circle
- Buddy - the number of elements that will be set to the same colour in the rainbow (if Buddy is greater than 1, the number of elements that are repeated over is Repeat multiplied by Buddy)
 Strobe
Renders a dynamic colour strobe effect on black:
- Transparency - select Opaque for none, Base Transparent to superimpose the effect onto other programming
- Colour - specifies the flash colour
- Period - the interval in seconds between the start of each flash
- Duration - the length in seconds of the flash
 Sparkle
Renders a dynamic random sparkle effect:
- Base Colour - the colour of the background
- Spark Colour - the colour of the spark
- Transparency - select Opaque for none, Base or Spark Transparent to superimpose the effect onto other programming
- Period - the rate of the effect (larger numbers are slower)
- Density - the density of the effect in percent (higher numbers, more sparks)
 Colour chase
Renders a dynamic chase through a user-specified sequence of colours:
- Colours - pressing the colour buttons will prompt for a new colour for that step
- Steps - the number of steps in the sequence
- Direction - choose Forwards, Backwards or Bounce (the latter uses two periods to complete)
- Period - the number of seconds that the sequence takes to complete
- Count - the number of times that the sequence should complete over the length of the preset
- Offset Style - choose None (all elements are the same colour) or Spread (the sequence is spread over space as well as time)
- Repeat - the number of elements to repeat the chase over
- Buddy - the number of elements that will be set to the same step (if Buddy is greater than 1, the number of elements that are repeated over is Repeat multiplied by Buddy)
- Fade - the fade time in seconds between each colour in the sequence
- Hold - the time that each colour in the sequence is not fading
 Colour on colour
Renders a dynamic pulse of colour passing over another colour:
- Base Colour - the base colour
- Top colour - the colour of the pulse
- Transparency - select Opaque for none, Base or Top Transparent to superimpose the effect onto other programming
- Period - the number of seconds that the sequence takes to complete
- Count - the number of times that the sequence should complete over the length of the preset
- Repeat - the number of elements to repeat the pulse over
- Buddy - the number of elements that will be set to the same colour in the pulse (if Buddy is greater than 1, the number of elements that are repeated over is Repeat multiplied by Buddy)
- Shape - the shape of the pulse (Sine, Triangle, Square, Ramp Up or Ramp Down)
- Pulse Width - the width of the pulse in percent (1 > 200%, if 100%, the pulse is half of the element width)
- Phase - the offset of the pulse in degrees
- Reverse Direction - reverses the direction of the pulse
- Invert Pulse - changes the starting position of the pulse
 Intensity
Renders static or dynamic intensity control:
- Level - intensity level
- Shape - choose None (static intensity) or a dynamic effect (Sine, Cosine, Square, Triangle or Ramp Up)
- Size - the amplitude of the effect
- Period - the period of the effect in seconds
- Count - the number of times that the effect should repeat over the length of the preset
- Offset Style - choose None (all elements are the same intensity), Spread (the effect is spread over space as well as time) or Once (as None, but will stop after one period)
- Reverse Direction - reverses the direction of the effect
- Repeat - the number of elements to repeat the effect over
- Buddy - the number of elements that will be set to the same intensity (if Buddy is greater than 1, the number of elements that are repeated over is Repeat multiplied by Buddy)
 Flicker
Renders dynamic,random flickering over a colour gradient:
- To change a colour, press on the coloured button, select a colour and press Ok
- To move a colour, click and drag the coloured button
- To add a new colour, click anywhere on the slider where there is no button
- To remove a colour, right-click on the coloured button
- Period - the period of the effect in seconds
- Sub - the amplitude of the low frequency perturbation
- First - the amplitude of the fundamental flicker frequency
- Second - the amplitude of the second harmonic
- Third - the amplitude of the third harmonic
- Seed - used to offset the effect; click the Randomise button to generate a random value
- Uniform - apply the Seed value as the offset for all fixtures in the group, or use it as a seed to generate random offsets for each fixture in the group
Each of the sliders corresponds to a sine wave of a specific frequency. The frequency of Sub is defined by the Period
- the default is 30 seconds (1/30Hz). First will be twice as fast, Second twice as fast again and and
Third twice as fast as Second. The value of each sine wave is used to fetch a value from a set of pre-generated random values and the four results are summed. The sum is used to select a position in the colour gradient to output to the fixtures. Mix the different frequency components
using the sliders to select how much of each component you want.
So if you are looking for a relatively steady flicker you might have a
lot of Sub, with a little bit of Third to stop it looking too
regular. If you want a more chaotic looking flicker then you might have
less of Sub and First and more of Second and Third. It really is something
you have to experiment with. If you want the overall flicker to have a different speed change the Period and everything will shift accordingly.
If you've got a set of slider values that you like and you want to copy the effect to another group, but not have both groups flickering identically, then just click the Randomise button to change the offset.
 Hue Fade
Performs a fade in hue between two defined points:
- Start Colour - defines the hue at the start of the preset, and the saturation and brightness throughout the preset
- End Colour - defines the hue at the end of the preset; saturation and brightness will be the same as the start colour
- Reverse Direction - reverses the direction of the hue fade
The start and end colours will share the same saturation and brightness; editing the saturation or brightness for one colour will edit the other as well.
The fade time between the colours is determined by the length of the preset on the timeline.
Matrix Presets
A range of presets from gradient colour fills to rainbow and text effects. These presets have spatial awareness and can be applied to Pixel Matrices using the inherent 2D information to determine how they are rendered and in what order the fixtures will transition. They are considerably more powerful than the standard presets and allow you to “paint” onto your fixture arrays:
 Text
Text
Renders a scrolling text message on a matrix:
- Text Colour - the text colour
- Base colour - the background colour
- Period - the number of seconds that the message takes to scroll over the matrix
- Count - the number of times that the message should scroll over the length of the preset
- Text - the text to render
- Offset - the percentage of the height of the matrix to offset the baseline of the text (positive is down, negative is up)
- Text Height - the height of the text in percentage of the matrix height
- Direction - the direction to scroll in
- Flip - flips the text upside down
- Mirror - flips the text left to right
- Bold - renders the text in bold
- Italic - renders the text in italic
- Font - the font to render the text in
 2D rainbow
Renders a dynamic rainbow effect on a matrix:
- Colour - specifies the start colour of the rainbow (the saturation and intensity are maintained throughout the cycle)
- Period - the number of seconds that the rainbow takes to complete one cycle
- Count - the number of times that the rainbow should cycle over the length of the preset
- Type - the shape of the rainbow effect (Linear, Radial, Conical, Square, Noise, Perlin Noise or Bilinear)
- Reverse - reverses the direction of the wave
If the Type is Linear, Radial, Conical, Square or Bilinear, the properties Angle, Repeat and Count are available:
- Repeat - the repeat style (None, Sawtooth, Triangle)
- Count - the number of repeats
- Angle - the angle in degrees of the wave (Linear, Conical & Bilinear only)
Note that setting Repeat to None will only have an apparent effect when the Type is Radial. It behaves like Sawtooth with a Count of 1, except that the area outside the unit circle is filled with the same colour as the edge of the unit circle, rather than the effect continuing beyond a Count of 1.
If the type is Noise:
- Seed - the seed of the pseudo-random noise (copying this value to another preset will create the same noise)
- Randomise - picks a new seed
If the type is Perlin Noise:
- Seed - the seed of the pseudo-random noise (copying this value to another preset will create the same noise)
- Randomise - picks a new seed
- X - the horizontal scale (higher numbers will produce more variation horizontally)
- Y - the vertical scale (higher numbers will produce more variation vertically)
- Depth - the coarseness of the noise
 Spiral rainbow
A special version of 2D Rainbow with conical type:
- Colour - specifies the start colour of the rainbow (the saturation and intensity are maintained throughout the cycle)
- Period - the number of seconds that the rainbow takes to complete one cycle
- Count - the number of times that the rainbow should cycle over the length of the preset
- Spokes - the number of times the rainbow repeats around the matrix
- Curve - an angle in degrees to curve the effect as it radiates from the centre of the matrix
- Reverse - reverses the direction of the spiral
 Gradient
Renders a static multi-colour gradient on a matrix:
- To change a colour, press on the coloured button, select a colour and press Ok
- To move a colour, click and drag the coloured button
- To add a new colour, click anywhere on the slider where there is no button
- To remove a colour, right-click on the coloured button
- Type - the shape of the rainbow effect (Linear, Radial, Conical, Square, Noise, Perlin Noise or Bilinear)
If the Type is Linear, Radial, Conical, Square or Bilinear, the properties Angle, Repeat and Count are available:
- Repeat - the repeat style (None, Sawtooth, Triangle)
- Count - the number of repeats
- Angle - the angle in degrees of the gradient (Linear, Conical & Bilinear only)
If the type is Noise:
- Seed - the seed of the pseudo-random noise (copying this value to another preset will create the same noise)
- Randomise - picks a new seed
If the type is Perlin Noise:
- Seed - the seed of the pseudo-random noise (copying this value to another preset will create the same noise)
- Randomise - picks a new seed
- X - the horizontal scale (higher numbers will produce more variation horizontally)
- Y - the vertical scale (higher numbers will produce more variation vertically)
- Depth - the coarseness of the noise
 Starfield
Renders a radiating star field:
- Space Colour - the colour of the background
- Star Colour - the colour of the stars
- Speed - the speed of the stars
- Star Count - the number of stars to show
 2D colour on colour
Renders a dynamic pulse of colour over another colour on a matrix:
- Base Colour - the base colour
- Top colour - the colour of the pulse
- Transparency - select Opaque for none, Base or Top Transparent to superimpose the effect onto other programming
- Period - the number of seconds that the sequence takes to complete
- Count - the number of times that the sequence should complete over the length of the preset
- Type - the type of pulse (Linear, Radial, Conical, Square, Noise, Perlin Noise or Bilinear)
- Shape - the shape of the pulse (Sine, Triangle, Square, Ramp Up or Ramp Down)
- Pulse Width - the width of the pulse in percent (1 > 200%, if 100% the pulse fills half of the matrix)
- Reverse Direction - reverses the direction of the pulse
- Invert Pulse - changes the starting position of the pulse
If the Type is Linear, Radial, Conical, Square or Bilinear, the properties Angle, Repeat and Count are available:
- Repeat - the repeat style (None, Sawtooth, Triangle)
- Count - the number of repeats
- Angle - the angle in degrees of the pulse (Linear, Conical & Bilinear only)
If the type is Noise:
- Seed - the seed of the pseudo-random noise (copying this value to another preset will create the same noise)
- Randomise - picks a new seed
If the type is Perlin Noise:
- Seed - the seed of the pseudo-random noise (copying this value to another preset will create the same noise)
- Randomise - picks a new seed
- X - the horizontal scale (higher numbers will produce more variation horizontally)
- Y - the vertical scale (higher numbers will produce more variation vertically)
- Depth - the coarseness of the noise
 Live video
Displays live video on a matrix (LPC X only):
- X&Y offset - map to the top left pixel of interest on the incoming DV image
 Perlin noise
Renders a smoothly-varying noise effect:
- To change a colour, press on the coloured button, select a colour and press Ok
- To move a colour, click and drag the coloured button
- To add a new colour, click anywhere on the slider where there is no button
- To remove a colour, right-click on the coloured button
- Period - the number of seconds that the noise takes to loop
- Count - the number of times that the noise should loop over the length of the preset
- X - the horizontal scale (higher numbers will produce more variation horizontally)
- Y - the vertical scale (higher numbers will produce more variation vertically)
- Depth - the coarseness of the noise
- Rate - the rate at which the noise varies
- Seed - the seed of the pseudo-random noise (copying this value to another preset will create the same noise)
- Randomise - picks a new seed
Dynamic text
Renders a text message which can be changed at runtime:
- Colour - the colour of the text
- Period - the number of seconds that the message takes to scroll over the matrix
- Count - the number of times that the message should scroll over the length of the preset
- Text - the text to render
- Font - the font to use to render the text (see the Fonts dialog below)
- Scroll - the scroll direction of the text
- Seamless Loop - if the text is set to scroll, setting this will remove the gap between the end and the start
- Alignment - if the text is set to not scroll, this is the alignment of the text (Left, Centre, Right)
- Mirror - flips the text left to right
- Flip - flips the text top to bottom
- Invert Colour - sets either the background or the text to be transparent
- Offset - set a offset amount on the Y axis of the matrix
To configure the font used by the Dynamic Text preset, press the [...] button next to the font picker to open the Fonts dialog:
- Select a font from the Font picker
- Press New to create a new font
- Press Delete to delete the selected font (note that you cannot delete a font that is in use in the project)
- Set the font's name in the Name property
- Use Family, Size, Bold and Italic to set the appearance of the font
- Press Ok to close the Fonts dialog
NOTE: Editing a font will change all Dynamic text presets that use that font not just the currently selected preset(s).
The Dynamic Text preset allows you to change the text after uploading the project to a Controller. To do this, you need to specify which parts of the text are going to change and which parts will remain the same.
For example, to show the opening time of a venue, you might set the Text property to "Opening Time: <open>". This creates a text slot called 'open' which you can change the value of. You can have more than one slot specified in the Text property, for example "Opening Time: <open> Closing Time: <close>".
To set the initial text for a text slot, press the [...] button next to the Text property to open the Dynamic Text Configuration dialog:
- Click in the Default Value cell of a slot to edit the text stored in that slot
- You can remove unused text slots by pressing Remove
- Press Ok to save changes and Cancel to discard changes
The Set Text Slot trigger action allows you to change the value of a text slot from a trigger.
There are two built-in slots, <time> and <date>, which show the current time and date respectively. You can change the format of how the time and date are displayed in the Dynamic Text Configuration dialog. Press the [...] button next to the Text property to open this dialog. At the bottom of the dialog you can select from some standard time and date formats, or type your own using the following codes:
| %a |
Abbreviated weekday name |
| %A |
Full weekday name |
| %b |
Abbreviated month name |
| %B |
Full month name |
| %c |
Date and time representation |
| %d |
Day of the month (01-31) |
| %H |
Hour in 24h format (00-23) |
| %I |
Hour in 12h format (01-12) |
| %j |
Day of the year (001-366) |
| %m |
Month as a decimal number (01-12) |
| %M |
Minute (00-59) |
| %p |
AM or PM designation |
| %S |
Second (00-61) |
| %U |
Week number with the first Sunday as the first day of week one (00-53) |
| %w |
Weekday as a decimal number with Sunday as 0 (0-6) |
| %W |
Week number with the first Monday as the first day of week one (00-53) |
| %x |
Date representation |
| %X |
Time representation |
| %y |
Year, last two digits (00-99) |
| %Y |
Year |
| %Z |
Timezone name or abbreviation |
| %% |
A % sign |
All other text is used verbatim. The computed output will be truncated to 255 characters.
Media Presets
 Preset (user named)
The presets that you optionally created using the Media window to import still and moving images into your project. These presets have spatial awareness when applied to Pixel Matrices in that the media clip will be resized to fit the Pixel Matrix’s Render Window.
NOTE: If no Media presets have been created, the Media Presets folder will not be displayed.
Media Slot Presets
The Media Slots that you optionally created using the Media window. These presets have spatial awareness when applied to Pixel Matrices in that Pharos Dynamic Media Manager will generate media for the Media Slot at the dimensions of the Pixel Matrix's render window.
Mover Presets
Mover presets do not have a length, only a transition (shown on the timeline), with the settings persisting until another Mover preset is encountered or the timeline released. They are applied to the dedicated Movers rows of a timeline.
 Preset (user named)
The presets that you optionally created using the Mover window to control the other parameters, typically position and gobo, of any automated lighting in your project.
NOTE: If no Mover presets have been created, the Mover Presets folder will not be displayed.
DALI Presets
Like Mover presets, DALI presets do not have a length, only a transition, with the settings persisting until another DALI preset is encountered.
However, unlike Mover presets, DALI presets will persist even if the timeline is released. Indeed, since they are just commands to tell the DALI ballasts what to do, even power-cycling the Controller will make no difference; the settings will persist until a new command is issued or the ballasts themselves power-cycled.
Set level
Used to set a DALI fixture or user created group to a level (0>254, 255), and select a fade time from the pull-down list of DALI fade times. See DALI regards creating DALI groups.
 Scene (user named)
Used to recall a DALI scene that you created and uploaded, and select a fade time from the pull-down list of DALI fade times. See DALI regards creating DALI scenes.
NOTE: If there are no DALI fixtures in the project, the DALI Presets folder will not be displayed.
AVC Presets
See Working with the Audio Visual Controller.
NOTE: If there are no AV fixtures in the project, the AVC Presets folder will not be displayed.
Custom Presets
 Preset (user named)
Renders a custom preset that you have optionally created using the Media window:
- Period - the number of seconds that the effect takes to complete one cycle
- Count - the number of times that the effect should cycle over the length of the preset
In addition, custom presets may define a number of properties that can be set for each instance of that preset on the timeline.
NOTE: If no Custom presets have been created, the Custom Presets folder will not be displayed.
 Related Topics